This is a big project. There are around 850 individual photos in this web catalog, and many more that I took which aren't part of the catalog, rejected, or awaiting to be included. Every single one of these photos had to be shot, loaded into the computer somehow, processed in Photoshop and referenced on one of the web pages.
Since this catalog was developed over so many years, technology kept changing and methods have changed as fast as I could write about them. I started out with 35mm camera using print or slide film, helped occasionally by a still frame from a Hi-8 video camera. Then I moved on to 1 megapixel stills from a digital video camera, and eventually a much better compact 3-Megapixel digital camera. None of these were entirely satisfactory until I finally acquired a 5 megapixel digital camera with ability to manually focus down to a fraction of an inch. For my 35mm film shots, I scanned the pictures into my Macintosh with a slide/negative scanner, and for the Hi-8 shots I grabbed the video stills using the Mac’s AV tape inputs. In Adobe Photoshop I did whatever digital manipulation was required to convert the pictures for display on the web.
Wildflowers are a mong the most difficult photographic subjects you can imagine--much worse than screaming babies. Flowers are often tiny but have a lot of depth, requiring good macro capability with a lot of depth of field, which means a high f/stop, long exposures, and a tripod. But most tripods don’t conveniently let you point to a flower an inch off the ground, not to mention getting your eye into the viewfinder to see what you’re aiming at, kneeling on muddy ground in a mosquito-infested swamp. To make things worse, they are often in a dimly lit forest requiring even longer exposures. But since flowers wiggle around in even the slightest breeze, they won’t stay still enough for even a fast exposure without a lot of setup: wind baffles, clamps, or sometimes (for a common plant) just pulling out the plant and bringing it into the house for a photo, during which time it wilts as fast as you can set up the camera. Flowers in sunlight aren’t much easier: the winds are worse, and the contrast is often too much for any camera to handle. A tall plant on a flimsy stem, like a , is almost never still enough to photograph clearly at close range.
If the weather isn’t perfect (and in New England it’s almost always breezy except early in the morning) you can’t just come back another day, because the flower may no longer be there. Some last only a day, and some just a few hours. Some are out only at night or very early in the morning. Each plant has its period of bloom, anywhere from March to October, and those with short blooming periods may be hard to catch. if you have a day job, you are forced to see them in poor late afternoon (i.e., breezy, dark) conditions, or be lucky enough to find them blooming on a weekend.
The following sections describe this sometimes painful process in gory detail. Kids, don’t try this at home.
Taking decent pictures of flowers with typical amateur 35mm cameras, especially wildflowers in the wild, is amazingly hard. Most people probably won’t have the equipment to do it.
For some of the photos in this catalog where the outdoor conditions were impossible to deal with (and where the flower wasn't too rare0, I just plucked the flower and took it home, positioning it against a flat background under controlled conditions. The problem is that indoor lighting is even dimmer than outoor lighting, and it has a different color. A flash could help, but for a closeup the flash has to be mounted well away from the camera, and without a lot of setup a flash creates inappropriate harsh shadows. It’s also very hard to calculate the correct exposure on a tiny flower lit by a flash.
So it may sound pretty hopeless, trying to capture flowers on film, but when everything is working right nothing beats the quality of a photos of a flower with a conventional camera. I have managed to make some decent photos for this catalog and even the inferior ones at least give you (and me) an idea of what the flower looks like. In addition to the flower, I usually tried to capture the whole plant, or a significant part of it, showing the leaves or stems where they are important for identification, because flowers alone aren’t always unique enough.
My 35mm camera is an Olympus OM-4, and most shots were made with Ektachrome Elite 200 or 400 and a f/3.5 35mm-105mm zoom lens or a standard f/2.8 50mm lens. The zoom lens has a pseudo-macro close focussing capability, but I still often resort to a 4-diopter closeup lens. I wish I had a true macro lens. I also sometimes use 400 speed Kodak print film.

The idea of using video for still photos involves grabbing a single frame from a movie and storing it on computer. Compared to using film, shooting video is incredibly easy. A decent 8mm camera can focus (automatically) so close that you have to watch out that you don’t bump into the object with the lens. The depth of field even at the closest distance is usually good enough to see the whole flower, and the camera can pick up a decent image even in the deepest, darkest woods on a cloudy day.
If that weren’t good enough, a flower that’s swaying in the breeze is not too much of a problem, because there are usually some frames in a video of several seconds where the flower is relatively still. With the right software I can view my video a frame at a time and just pick the one I like best.
Even better, I can see the results instantly and retake the shot if it’s not good enough. I can speak into the camera, so I don’t need to keep detailed notes of what I’ve done in order to correlate the photos to the identifications several days later when I get the pictures back, and I can reuse the video tape, so I don’t end up with boxes of photos or slides that serve no purpose after I scan them in.
So there must be a drawback, right? Yes, a very big, almost fatal one. Video comes into the computer as frames of 640x480 pixels, and the hi-8 video camera itself really only has a resolution around 400x480 at best. This is marginal resolution, even for display on the web. At 72 dpi of most monitors the original frame can be viewd about 8" wide, but at that size you will definitely notice the inferior quality of the shot compared to a scanned photo. The problem is not just resolution, but smearing of bright colors and “color noise” typical of video. In contrast to video, I can scan in a 35mm slide at a useful resolution up to 3400x2700 pixels, though that is far more than I would need for display on the web.
To make matters worse, the “interlaced” nature of NTSC video means that alternating scan lines are shot 1/60 second apart, so if there is even the slightest movement of the hand or flower you will easily see jagged edges that need to be removed, and this “de-interlace” process reduces in half the effective vertical resolution. Now we’re down to a mere 400x240 lines of resolution.
You may not notice the lower quality of the video frames in the thumbnail pictures on the main pages, because reducing the shot in size by a facter of 3 or so hides most of the problems. But if you click on one of those pictures to see the full-size frame, you will likely be disappointed, as it may look no better, with no more detail, than the tiny photo.
When photographing flowers I usually find it necessary to set the camera to manual focus. If the flower is small relative to the background, the camera is more likely to focus on the background than the foreground. Even when the camera is focussing on the flower, the autofocus constantly “hunts” back and forth, slightly blurring and then refocussing the image from instant to instant. This is barely noticeable when viewing the video, but it means that many frames are simply out of focus, so whether you get a good one is luck of the draw.
Some of the video shots are vastly improved because I brought the flower indoors and hooked the camera directly to the computer. This eliminates the very noticeable loss of quality through the taping and playback process, and lets me manually adjust the focus very precisely. Also, with the camera and flower both motionless, there’s no need to de-interlace. Best of all, I have an opportunity to take multiple identical shots that, with procerssing, can enhance the quality of the final image, as I discuss in the next section below. The result is a picture nearly as good as a 35mm photo, with the limit of about 400x480 resolution.
My camera was a horribly unreliable and now defunct Hitachi VMH-39A hi-8 video camera, one of the early models of the Hi-8 generation. I wouldn’t even attempt to capture stills with a regular 8 or VHS camera. However, the camera leaves a lot to be desired for this type of work and I have many complaints about its lack of decent manual controls. Most obnoxious is the fact that, when using manual focus, a big white “FOCUS M” is constantly visible in the frame, not only in the viewfinder, but also transmitted on the video outputs!! (What were they thinking?) Luckily it’s usually not too hard to get rid of this in Photoshop, providing it’s in a background area. Another serious deficiency is the inability to control the brightness or f/stop of the lens. When my background is a piece of black construction paper and the delicate little foreground flower is illuminated even slightly, the camera sets its brightness level to an average of the whole scene and grossly overexposes the flower. The camera has a “backlight” button to compensate for a dark object in a light background, but it has no forgeround setting to do the reverse. (This also makes it a poor camera for capturing performances on stage.) A final complaint is lack of a shutter speed control. If I could speed up the shutter, at least in bright light, I could minimize the horizontal blur from moving objects (don’t know if it would affect the interlace problem). Instead, the camera automatically chooses a shutter speed for you. (Likewise, there are frequent cases in normal shooting where there is fast motion and the result of using a fast shutter speed, which it automatically does in bright light, gives an irritating effect.) But the camera does have all sorts of hokey titling and special effects which I have never used. End of diatribe.
So I got better closeups, but the bad news was that it didn’t work that well for some more distant shots. The depth of field was actually objectionable because thin flimsy plants would merge with their background, and the overall color was not so accurate. Color noise, even in bright light, often detracted from the picture and obscured detail, and contrast was frequently excessive. In general, the overall quality of the images did not really approach what 1 megapixel should have been capable of delivering. This is a problem common to all Mini-DV cameras that take still shots, due to design compromises made by using a video sensor chip for still pictures.
Nonetheless this camera finally allowed me to get many great closeups that were previously impossible to capture, and at this point I basically abandoned all use of my film camera for wildflower photography.
The world has changed a lot since I began this project. Eventually I acquired a Sony DSC-P1 compact digital camera with 3.3 Megapixels. While it could not take as good a picture as the best I could get with my 35mm film camera, it had a major advantage: I could see results immediately and can keep reshooting until I got one I liked. Also, at its closest focus, it has a noticeably better depth of field, and far better image quality than the 1 megapixel still video camera.
But this camera had some serious limitations. As a compact, it had no manual focus, so I had to coerce it to focus on a flower when it wanted to focus on the background, usually unsuccessfully. It had no manaul aperture setting, so I had no control over depth of field. And since it could not close focus anywhere near the Mini-DV camera, I still resorted to the video camera for individual flowers. Finally, there was no way to determine with certainty out in the field that a photo was well-focused, since the tiny LCD screen on the back of the camera didn’t provide enough detail.
Most of the best photos taken with this camera were of whole plants or larger leaves, that showed very nice detail.
Pentax Optio 555, 5 Megapixel
We have almost reached Nirvanna: an ultra-compact camera easy to carry in the field with all the resolution one could want, reasonably fast lens, full manual control over aperture, shutter speed, and focus, close focus down to under an inch, and ability to zoom into a captured photo on the LCD screen to see if it in focus. When I got this camera, I abandoned all other equipment for wildflower photography, as it did everything they did, usually better and with less effort.
Five megapixels is far more than you need for a picture on the web. What this resolution gives you is the ability to crop and enlarge small portions of a photo. So instead of lying on my stomach in the swamp trying to get my camera lens within an inch of a tiny flower, blocking my own light in the process, I can shoot from a more comfortable distance and just enlarge the result.
There is a big caveat: the more you enlarge, the more critical the need to focus perfectly and avoid all camera movement. Handheld shots at speeds slower than 1/120th of a second can’t really be enlarged very much without objectionable blur. In the dense shade this is too slow for the camera’s f/2.8 lens and ISO 400 limit, and at ISO 400 the picture becomes too “noisy” for a quality photograph. Furthermore, to maximize depth of field, a high f/stop is desirable, so I like to keep it set to its maximum of f/7.9 unless I purposely want to blur the background. This can require an exposure of up to 1 second or even more.
The only solution is to carry a tripod, and I have taken to bringing a lightweight tripod on my walks out into the woods. To avoid shaking the camera when I press the shutter, I user either the self-timer or a remote infrared shutter release (a wonderful accessory for this purpose).
Still we have the ever-present wind. For an exposure that long, the flower must be rock-steady, and few are. Enter the Plamp, a $35 contraption made by Wimberly. One end clamps to your tripod or a solid object, and the other end gently grabs the plant without damaging even the most fragile stems. Depending on the shape of the plant and location of the camera, you can usually steady the flower enough, with the clamp out of the picture, in most mild breezes.
If the wind is still too strong, it is sometimes necessary to clamp the stem right under a flower where it will show in the picture. The white clamp looks very ugly in a photo, but it’s not that hard to get rid of it: take two photos, one with the clamp and one without, from exactly the same position, trying to hold the plant stem and flower as close as possible to the position it was with the clamp attached. Later, in Photoshop, use the clone tool to paint the appropriate areas of the photo without the clamp onto where the clamp is in the other photo. The main difficulty with this technique is that the stem and flower in the two photos are still not in exactly the same locations, so it’s usually necessary to select the clamp and paint over only that portion, and then manually clone some portion of the stem onto where the Plamp was hiding it.
My computer started out as a 120 MHz PowerMac 8500 with 240 MB of RAM (which seemed big, once). It was quite fine for the type of stuff I was doing at first with lower resolution material, but for higher resolution Photoshop work or capturing video (as I mentioned above) a faster machine was needed. After that I upgraded my processor to a 290 MHz G3, which seems to run 2 or 3 times faster for memory-intensive tasks. This was fine until I started working with 5 megapixel images, and sometimes I felt like I spent more time waiting for files to open than doing creative work. My current machine is a dual 2.5 GHz G5 PowerMac, the top of the line in Macs when I bought it in 2004, and (for now at least) I can't say that the computer is a factor in the speed at which I can work.
Most important is my 21" monitor. This allows me to see several views of an image at the same time, or a whole image at greatly increased magnification for detailed editing. I also find my Wacom tablet very handy for many of the Photoshop tools, though the 12" tablet size is bigger than I need. Actually I now have two 21" monitors -- the more other better for Photoshop work.
To get an image from 35mm film into the machine, I used a Nikon Super Coolscan (LS-1000 and later LS-2000) to scan the slides or negatives. I wanted the full-size frames to be about 8 or 9 inches across on the screen (about 600-700 pixels) so I scanned them in at twice that resolution in order to give me room for manipulation, enlarging, etc. Since a 35mm slide is about 1.5" wide, this means scanning at around 800 dpi on the slide itself, far less than the 2700 dpi capability of the Nikon scanner, but more than typical desktop scanners can do (including those with transparency adapters). Occasionally when I wanted to extract and enlarge a small detail from a frame, I would scan at much higher resolution. The Nikon software has image manipulation capabilities, but I left all its settings at the default and used the software as a plug-in to Photoshop, where image manipulation is more convenient.
For the analog Hi-8 video images, I used the PowerMac’s built-in AV hardware. I plugged the video camera into the S-video port on the machine and, in most cases, used the Apple Video Player (software that came with the machine) to view the movie in a window at a maximum 640x480 resolution. The video player lets you capture frames to the clipboard by clicking “copy” at the desired instant while the video is playing. After copying I switched to Photoshop, selected “New”, which opened up a blank document window the exact size of the clipboard, and then I pasted in the video image.
For problem videos where the object is in motion, it’s too hard to capture a specific frame in a continuous movie, and my video camera does not have a noise-free pause to stop the movie. For these cases I tried two things: copy the tape onto an S-VHS recorder which has a perfect single-frame capability, or read the continuous movie into memory as a Quicktime movie using Avid Videoshop (more software that came with the computer). The S-VHS method is actually less work because Videoshop is so slow, but there’s a loss of quality in making the copy. Reading the movie into memory gives me the original quality of the recording, but my computer is not fast enough to capture every frame. Sometimes I’m missing a long series of frames in a row. Once the movie is in memory (and we’re talking less than 10 seconds of video before memory fills up) Videoshop lets you examine each frame before choosing one to copy into Photoshop.
Of course, once I got my digital cameras reading into the computer was no longer a big deal, and the results are superior to any scan of film or video captuer.
Once in Photoshop, I have a lot of freedom to manipulate the picture. Most of the 35mm shots need only minor color and brightness/contrast adjustments, but if there is an undesired background, especially for shots taken indoors, I might do more work to eliminate it. Almost all photos benefit from artificial sharpening (e.g., using Photoshop’s unsharp mask).
 | 
|
| Original Interlaced image | De-interlaced |
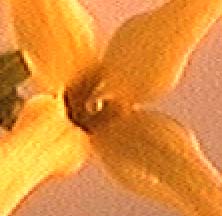
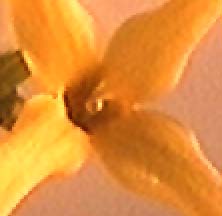
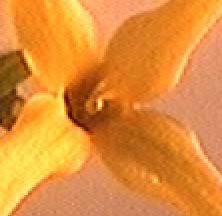
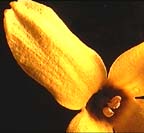
Another thing I find useful for video is the despeckle filter to get rid of video noise, which appears as random fluctuations of color and brightness between pixels in solid color areas as you can see in the 2x enlargement below left. This filter is not an ideal solution, as despeckling causes a loss of resolution if you apply it to areas of fine detail. Notice in the center photo below how the faint lines in the yellow petals are nearly gone. Also, a despeckled area next to a speckled area makes the picture look manipulated. It’s annoying that, when you look at a continuous running video of a perfectly still image on the screen, it looks tons better than a snapshot of a single frame. This is because your eye averages a series of frames, giving you the impression of an image that is far better than any one frame (that’s the only reason why the old-fashioned 8mm movie film was tolerable to watch). Why can’t the computer do the same thing? Certainly it can, but I haven’t found a tool that does it--a continous video of a motionless image is not a common thing to do. But I have an approximate solution. When the camera is pointed at a steady object indoors, each frame of the video has the speckles in slightly different places. By "“averaging” a number of frames, the speckles should average out in all areas of the image, yielding smooth color in solid areas, without any loss of resolution in the details. In fact, this averaging should actually increase resolution--scientists use analogous methods of multiple observations for getting detail out of measurements beyond the capability of their instruments. Since Photoshop doesn’t have such an averaging tool, I simulated it by overlaying several separate images on different layers, and specifying appropriate transparency to each layer. For example, with 3 layers, the middle layer gets 50% transparency, letting half of the lower layer through, and the top layer gets 33%, so that each layer contributes 33% to the final image. It’s not mathematically the same as a true average, but the results shown in the picture below right clearly give less speckling, and a superior image, than the one on the left, while all the original resolution is retained (notice the faint lines in the yellow petals). I imagine I could keep averaging 4, 5 or 10 images with better and better results, but the work to do this is proportional to the number of frames, while the improvement falls off exponentially at least. Anyone know of a video averaging tool?
| Note: These pictures below will only make sense if you set your monitor to millions of colors | ||||||||
|
|
|
||||||
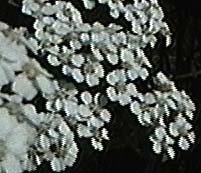
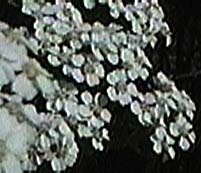
I use another compositing method for videos where the depth of field of the camera is insufficient, as when shooting multiple small flowers on a stem, each at a slightly different distance. Again, the camera and subject have to be mounted so they don’t move. I capture several identical frames, but with the manual focus adjusted to different parts of the object, and I put each frame in a different Photoshop layer. Then, using a layer mask, I can specify for each layer which parts I want to show through. For example, say I have two layers, the bottom layer containing the petals in focus, which are closer to the lens, and a top layer with just the center of a flower in focus, which is farther from the lens. Initially the top layer mask is white, which means that the top layer is 100% transparent, so all of the bottom layer shows through and none of the top layer is visible. Using the paintbrush tool, I select the top layer mask and paint in the area of the center of the flower using a feathered brush. Where I paint, the mask gets black (and shades of gray), but what I see on the screen is, wherever I paint, the top layer starts to show through the areas where the mask is black, and completely or partially obscures the lower layer. It’s easy to bring the center of the flower in clear focus without adversely affecting any other part of the picture, and the effect is completely convincing. Although it sounds complicated, this is fairly simple to do and worth the trouble. Compare the three images below. A good example where I used this method, is to capture multiple flowers on a stem.
|
|
|
A similar compositing method works with lighting problems, where it’s hard to get even lighting on all parts of the object at the same time -- just light each part individually and combine them.
But none of these compositing methods work unless the flower and camera are mounted on a rock-solid platform, so it only works indoors in tightly controlled conditions. This is a lot harder to do than you would think, because all these plants I pick and bring indoors are dying! And when they die, they go limp. Almost without exception, successive frames, taked even a few seconds apart, will show the plant drooping. I try to work fast and I keep the base of the plant or flower in water up until the last minute, but they still seem to move and even change their shape. Fortunately, Photoshop makes it fairly easy to move and rotate layers relative to each other, so the multiple-focus and lighting methods I described above still work OK, but I can’t use the despeckling trick unless the multiple layers are absolutely identical in the first place and that’s fairly rare.
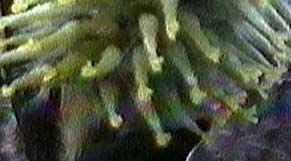 There is one type of video artifact that I’ve found impossible to remove. I’m not sure what it’s called, but it results in a rainbow effect where there should be solid color. Notice in the image on the right, the faint rainbow-like pattern across most of the picture, just below the center (you may see nothing unless your monitor is set to millions of colors). It tends to happen in areas of dim light, but I’ve seen it in bright light as well. I don’t think it’s a bug in my camera, as I’ve seen it in other cameras, but I’m sure a high quality video camera would not show this.
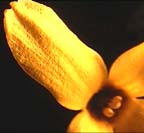
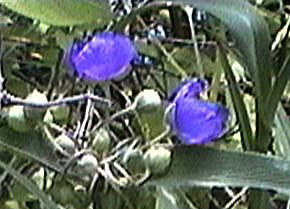
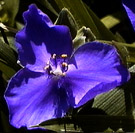
Of course, there’s the infamous “bleeding” where a saturated color--usually red or blue--smears into the surrounding area. Unlike other video artifacts, this one is evident even in a continuous movie, and you can normally see it on even the best TV screens. I don’t know if this problem is in the camera or video tape, but I suspect it’s the tape, as I don’t get it when I send the video image directly into the computer. The effect is particularly annoying for flowers, as it wrecks what would otherwise be the brightest and boldest images, as you can see in the pictures of a Spiderwort on the left below. The one on the right was done with the same camera, but hooked directly to the computer rather than through tape.
 |
|
| Color smear, recorded on videotape | No smear, direct computer input |
Unlike processing photos, using a sharpening filter on a video often makes it worse, enhancing video noise or other video artifacts, but color and brightness/contrast correction usually work well.
For ’s a video frame or film, I usually did color correction by asking Photoshop to show me its “variations” and then picking the ones that seem right based on my memory of the real object, comparing the screen to the slide or print, or holding up the real object next to the screen. Unfortunately everyone’s monitor is different, so no color adjustment that I can do will guarantee that you will see the intended colors.
Correct color is important for scientific accuracy, but for a picture with punch it’s even more important to set the overall brightness and “gamma” to the correct levels, especially for images that are mostly dark or mostly light. This requires calibrating my monitor so that things look to me the same way they’ll look to most other viewers. I found, through trial and error, that the settings I had been using on my monitor (maximum brightness and contrast) resulted in unreasonably dark pictures on other people’s screens, so I have since toned down the brightness.
Digital camera images usually have a more accurate color, so post processing a digital camera image usually involves only saturation, levels, and the new Photoshop CS “highlights/shadows” controls.
Using one more more of the steps above, it can take from 5 minutes to a half hour to touch up a photo, depending on how motivated I feel. A lousy photo can’t be made great this way, but a dull photo can usually be spiced up a lot without being unfaithful to the original subject. Many digital camera images are so good out of the box that they need little more then cropping.
Once I have the image the way I want I save it in three forms: a Photoshop file, a full-size JPEG file (“medium quality”) and a reduced in size JPEG image for display in the thumbnails on the text pages. The Photoshop files are rather large, 4 or 5 times the size of the JPEGs, but they preserve all the original information in my pictures in case I ever want to change them or use them for another purpose. Manipulating a JPEG image in Photoshop almost always gives poor results, so these are suitable only for Web use. I keep the Photoshop files on my Mac and I download the large and small JPEGs to my web site. I also leave a copy of everything on my Mac, so I can work on the catalog and use my browser on local files, without connecting to the web.
For shots with my digital camera which started out as JPEGs, I don’t bother to save in Photoshop format. I just keep the original unmodified JPEG in cases I need to go back to it. Now that I use iPhoto to organize my “rolls” of pictures, I have the opportunity to revert back to the original photo without going to any effort to make a copy when editing (this has saved my life a couple of times).